Introduction to DIY Camp Lighting
When you step into the wild, lighting is more than just a necessity—it’s an opportunity to infuse your campsite with creativity and comfort. Building your own camp lighting solutions gives you the freedom to tailor every detail, from brightness and color to mounting style and material. Custom lanterns and flashlight mounts not only make your gear uniquely yours, but they also add practical value that store-bought options can’t always match. Whether you’re aiming for soft ambient light under the trees or a focused beam for late-night hikes, DIY projects let you adapt your setup to any environment. Plus, crafting your own equipment brings a sense of accomplishment and connection to your outdoor experience. As you customize your camp lighting, you’ll discover new ways to express your personality and enhance both the function and atmosphere of your adventures.
Choosing Materials and Tools
When creating your own camp lighting, the right materials and tools make all the difference. Opting for sustainable and locally available resources not only benefits the environment but also enhances your DIY experience. Focus on items that are easy to source, durable, and reusable whenever possible. Below is a practical guide to help you choose wisely.
Common & Sustainable Materials
| Material | Why Choose It? | Where to Source |
|---|---|---|
| Mason Jars / Glass Bottles | Reusable, heat-resistant, classic American look | Thrift stores, recycling bins, kitchen supplies |
| Bamboo or Wood Scraps | Biodegradable, sturdy, natural aesthetic | Lumber yards, backyard scraps, craft stores |
| Cotton Rope or Twine | Renewable, flexible for hanging or handles | Hardware stores, gardening sections |
| LED Bulbs (Battery-Powered) | Energy-efficient, safe for outdoor use | Home improvement stores, online retailers |
| Recycled Metal (Cans, Wire) | Upcycles waste, provides structure | Home recycling bin, local scrap yards |
| Nontoxic Paint or Beeswax Finish | Safe for handling, enhances durability | Eco-friendly hardware suppliers, farmer’s markets |
Must-Have Tools for Safe DIY Lighting Projects
- Screwdriver Set: For assembling mounts and opening battery compartments.
- Pliers & Wire Cutters: Essential for working with metal or wiring.
- Hot Glue Gun (Low Temp): Quick bonding without high heat risks.
- Hand Drill: For precise holes in wood, bamboo, or plastic.
- Sanding Block: Smooths rough edges for safety and comfort.
- Tape Measure: Ensures accurate sizing and symmetry.
- Protective Gear: Gloves and goggles keep your hands and eyes safe.
Sourcing Tips & Eco-Friendly Reminders
The best materials often come from what you already have at home or can find second-hand. Check local garage sales or community swap events—Americans love upcycling as part of the maker culture. Always prioritize LED lights over traditional bulbs for energy savings. And remember: when working outdoors or in shared spaces, leave no trace—pack out all unused bits and recycle responsibly. Thoughtful sourcing brings both beauty and sustainability to your custom lanterns and flashlight mounts.
![]()
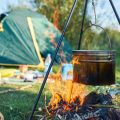
3. Making Custom Lanterns
Step-by-Step Inspiration for Building Your Own Camp Lanterns
There’s something magical about lighting up your campsite with lanterns you’ve made yourself. Whether you’re a fan of upcycling, crave the warmth of natural materials, or love clean lines and simplicity, making custom lanterns lets you add your own signature to every night outdoors. Here’s how to get started:
Upcycled Jar Lanterns
Gather glass jars from home—think mason jars, salsa containers, or anything clear. Clean them thoroughly and remove labels. Place a battery-powered tea light inside for safety. For extra charm, wrap the jar with thin wire to create a handle or hanger, and accent with found twigs or pressed leaves. Hang them from tree branches or set them on picnic tables for a soft, inviting glow.
Reclaimed Wood Designs
If you have leftover wood scraps or old fence boards, transform them into rustic lantern frames. Cut four equal-length pieces for the sides and secure with small nails or screws. Fit a glass panel (or recycled plastic) on each side if desired, then place a small LED light or candle in the center. The wood’s natural grain brings earthy beauty to your site while keeping waste out of landfills.
Minimalist DIY Lanterns
For those who love minimalist aesthetics, try using simple geometric shapes and neutral colors. Use frosted plastic sheets or white paper as shades around a small LED puck light. Keep designs clean—think cubes or cylinders—and use natural-finish dowels or bamboo for structure. These lightweight lanterns are easy to pack and blend seamlessly with any outdoor setting.
Pro Tip: Safety First
Always opt for battery-powered lights instead of open flames in your homemade lanterns—especially in wooded areas or during dry spells. Not only is it safer, but many modern LED lights offer warm tones and adjustable brightness to set just the right mood.
4. Creative Flashlight Mounts
Lighting flexibility is key for a comfortable campsite. With the right DIY hacks, you can secure flashlights anywhere—on tent poles, tree branches, or even your backpack—without extra weight or fuss. Here’s how to mount your lights with natural and minimal materials for both function and beauty.
Mounting Methods
| Location | Material | How-To |
|---|---|---|
| Tent Poles | Paracord | Wrap paracord around the pole and flashlight body; tie a simple clove hitch to hold it steady. |
| Tree Branches | Natural Fibers (e.g., jute twine) | Loop twine around the branch, then create a cradle for the flashlight with a basic overhand knot. |
| Backpack Straps | Velcro Straps or Rubber Bands | Secure the flashlight to the strap with Velcro, keeping it within easy reach as you move. |
| Campsite Table or Chair | Binder Clip + Paracord | Clip the flashlight using a large binder clip, then fasten it with paracord for extra security. |
Tips for Secure Mounts
- Choose mounting spots above eye level to avoid glare.
- If using hardware like S-hooks or carabiners, opt for lightweight aluminum for easy packing.
- Naturally sourced fibers blend with the environment and leave no trace when removed.
- Avoid overtightening ties on delicate branches to respect nature and prevent damage.
Simple Paracord Lashing Steps:
- Create a loop at one end of your paracord.
- Place the loop around the object (pole or branch).
- Lash the free end tightly around both flashlight and support point, securing with a knot.
- Tuck in loose ends for safety and neatness.
Minimal Gear, Maximum Adaptability
With just a few basic materials—paracord, natural fiber twine, Velcro, or even found objects—you can adapt your lighting setup to any environment. This approach keeps your camp organized while honoring the surrounding landscape.
5. Mixing Function with Aesthetics
Blending functionality and aesthetics is essential when creating your own camp lighting solutions. Minimalist design pairs beautifully with the outdoors, allowing your lanterns and flashlight mounts to complement nature rather than compete with it. Opt for simple shapes and neutral colors—think matte blacks, soft grays, or even unfinished woods—to keep your DIY creations subtle yet stylish. When choosing materials, consider natural fibers or recycled elements that echo the environment around you.
Balance Practicality and Beauty
Your lighting should serve its purpose without overwhelming your campsite’s natural charm. Focus on clean lines and uncomplicated structures; a mason jar lantern or a slim wooden mount can provide all the light you need without cluttering your space. Use battery-powered LEDs for efficiency, and try diffusing harsh light with frosted covers or fabric wraps.
Tips for Seamless Integration
- Hang lanterns from branches with twine for an organic look.
- Use earth-toned spray paint to blend mounts into tree trunks or rocks.
- Keep wiring concealed by running cords along natural lines in wood or stone.
Create Visual Harmony
The key is subtlety—let your lighting quietly enhance the experience rather than stand out. Arrange lights at different heights to mimic fireflies, or cluster small lanterns in groups for a cozy glow. By merging minimalist aesthetics with practical function, your DIY lighting will feel like a natural extension of the landscape, elevating both comfort and ambiance at your next campout.
6. Safety and Sustainability
When creating your own camp lighting, safety and sustainability should always be at the heart of your designs. Homemade lanterns and flashlight mounts are not just about creativity—theyre about caring for people and the planet. Choosing low-heat, battery-powered LED lights minimizes fire risk and energy use. Secure all fixtures firmly to avoid tripping hazards, especially in shared spaces or near tents. For sustainability, opt for rechargeable batteries and reusable materials like glass jars, metal clips, or fabric scraps—these reduce waste and keep your setup eco-friendly.
Practice mindful placement: angle your lights downward to prevent light pollution and protect local wildlife rhythms. Use only as much light as you need, switching off extras when not in use. Always pack out every piece of your DIY gear, leaving campsites as pristine as you found them—this honors Leave No Trace principles. If you experiment with solar-powered solutions, youll further reduce your footprint while enjoying nature’s rhythm. With thoughtful choices, your custom lighting projects will keep friends safe, respect wild places, and let nature’s beauty shine through.