Intro to Dutch Oven Cooking Outdoors
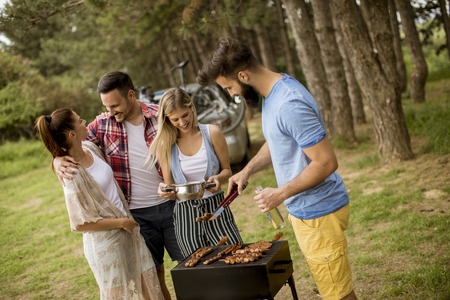
When youre cooking for a crowd on a camping trip, nothing beats the versatility and reliability of a Dutch oven. This heavy-duty cast iron pot can handle everything from stews and chili to casseroles and cobblers—perfect for feeding hungry campers after a day of hiking, swimming, or just relaxing by the fire.
Why Use a Dutch Oven for Group Camping Meals?
Cooking with a Dutch oven outdoors lets you make large portions of delicious, hearty meals that bring everyone together. Its thick walls and lid hold heat well and cook food evenly, whether youre using charcoal briquettes or an open flame. Plus, it’s rugged enough to survive any camping adventure.
Essential Gear for Dutch Oven Cooking
Before you dive into recipes, make sure you have the right tools. Heres what youll need:
| Gear | Purpose |
|---|---|
| Dutch Oven (6-12 quart) | Main cookware for big-batch meals |
| Lid Lifter or Tongs | For safely removing the hot lid |
| Tripod or Cooking Stand (optional) | To hang your Dutch oven over the fire |
| Charcoal Chimney Starter | Helps light coals quickly and evenly |
| Heat-Resistant Gloves | Protect your hands from high temperatures |
Managing Heat Like a Pro
The key to successful Dutch oven cooking is heat control. Whether youre baking biscuits or simmering stew, knowing how to manage your coals makes all the difference. Here’s a quick guide to coal placement:
| Cooking Method | Top Coals | Bottom Coals |
|---|---|---|
| Baking (e.g., cornbread) | 2/3 of total coals on top | 1/3 on bottom |
| Roasting (e.g., chicken) | Evenly split between top and bottom | |
| Simmering/Boiling (e.g., soup) | No coals on top or very few | Mainly bottom heat only |
Pro Tip:
A general rule is to use about twice as many coals as the diameter of your Dutch oven. For example, a 12-inch pot typically needs around 24 coals—16 on top and 8 underneath for baking.
Caring for Your Cast Iron in the Wild
Your Dutch oven will last for decades if you treat it right. After cooking, let it cool down before cleaning. Avoid soap—instead, scrub with warm water and a brush or scraper. Dry it completely and coat lightly with oil before storing it away. Always store with the lid slightly ajar to avoid rust.
Quick Maintenance Checklist:
- Cool completely before cleaning
- No soap—just water and elbow grease
- Towel dry immediately to prevent rust
- Add a thin layer of oil before storing
- Store with lid cracked open for airflow
Now that youve got the basics down, youre ready to start cooking up some crowd-pleasing meals on your next camping trip!
2. Planning and Prepping for Large Groups
Cooking for a crowd while camping can be fun, but it definitely takes some planning. When youre feeding a group, especially with big-batch Dutch oven meals, getting organized ahead of time is key to keeping things stress-free at the campsite. Heres how you can plan your meals, estimate portions, and prep ingredients in advance.
Estimate Portions Like a Pro
You don’t want to run out of food — or bring way too much. A good rule of thumb is to plan about 1 to 1.5 servings per person, depending on appetites and activity levels. Here’s a simple chart to help you figure out how much food you’ll need:
| Ingredient | Amount per Person | For 10 People | For 20 People |
|---|---|---|---|
| Protein (meat, beans) | 6–8 oz | 4.5–5 lbs | 9–10 lbs |
| Vegetables | 1 cup | 10 cups (about 5 lbs) | 20 cups (about 10 lbs) |
| Carbs (rice, pasta, potatoes) | 1 cup cooked | 10 cups cooked (about 2.5 lbs dry) | 20 cups cooked (about 5 lbs dry) |
| Sauce or broth | 1/4 cup | 2.5 cups | 5 cups |
Create a Simple Menu Plan
Stick with recipes that use similar ingredients to cut down on packing and waste. For example, if you’re using bell peppers in a breakfast scramble, toss the extras into your chili for dinner. Try planning one-pot meals that are easy to scale up and cook evenly in a Dutch oven.
Sample One-Day Menu for 12 Campers:
| Meal | Dutch Oven Dish |
|---|---|
| Breakfast | Sausage & Veggie Breakfast Hash |
| Lunch | Creamy Chicken & Rice Casserole |
| Dinner | Campfire Chili with Cornbread Topping |
| Dessert | Peach Cobbler with Biscuit Crust |
Prep Ingredients Before You Go
The more you do at home, the less youll have to worry about at camp. Chop veggies, portion out spices, marinate meats, and pre-mix dry ingredients before hitting the road. Use zip-top bags or reusable containers labeled by recipe name to stay organized.
Pro Tips:
- Label everything: Use masking tape and a marker to label ingredients by meal.
- Use color-coded bags: For example, blue for breakfast, red for dinner.
- Freeze what you can: Frozen meats or sauces double as ice packs in your cooler.
- Create a meal checklist: Track which meals are prepped and packed.
A Little Prep Goes a Long Way
If you take time to plan your menu and prep ingredients before the trip, cooking large meals at camp becomes way easier — and more enjoyable. With a trusty Dutch oven and some smart prep work, youll be serving up delicious group meals in no time!
3. Hearty Breakfasts to Start the Day Right
When youre camping with a group, breakfast isnt just the most important meal of the day—its the fuel that gets everyone ready for hiking, paddling, or exploring the great outdoors. A big-batch Dutch oven breakfast is a game changer when youre cooking for a crowd. From hearty casseroles to sweet cinnamon rolls, your campsite crew will be full and happy in no time.
Dutch Oven Breakfast Casserole
This one-pot wonder is a camp favorite. It layers eggs, sausage, potatoes, cheese, and veggies into a warm, comforting dish thats easy to serve and even easier to love. Prep it the night before and throw it on the coals in the morning.
Ingredients:
- 1 dozen eggs
- 1 lb breakfast sausage (or bacon)
- 4 cups frozen hash browns
- 1 cup shredded cheddar cheese
- 1 bell pepper, diced
- 1/2 onion, chopped
- Salt and pepper to taste
Instructions:
- Brown sausage or bacon in the Dutch oven over medium heat.
- Add onions and bell peppers; cook until soft.
- Add hash browns and cook until slightly crispy.
- In a bowl, beat eggs with salt and pepper.
- Pour eggs evenly over the mixture in the Dutch oven.
- Sprinkle cheese on top.
- Bake with coals on top and bottom for about 30–40 minutes until eggs are set.
Cinnamon Rolls for a Sweet Start
If youve got some early risers with a sweet tooth, nothing beats waking up to warm cinnamon rolls baked in a Dutch oven. Whether you use store-bought dough or make your own ahead of time, these rolls are always a hit around camp.
Cinnamon Roll Tips:
- Dough: Use pre-made cinnamon roll dough for convenience or prep homemade dough at home before your trip.
- Lining: Line your Dutch oven with parchment paper for easy cleanup and perfect rolls every time.
- Icing: Bring a small container of icing to drizzle over hot rolls right before serving.
Baking Chart:
| Dutch Oven Size | # of Rolls (Standard Size) | Bake Time (Minutes) | # of Coals (Top/Bottom) |
|---|---|---|---|
| 10-inch | 6–8 | 20–25 | 14 / 7 |
| 12-inch | 10–12 | 25–30 | 16 / 8 |
A warm breakfast can set the tone for an awesome day outdoors. These Dutch oven recipes are simple, satisfying, and perfect for feeding hungry campers without a ton of effort. Plus, they keep everyone fueled up for whatever adventure comes next!
4. One-Pot Wonders for Crowd-Pleasing Dinners
When youre feeding a hungry group at the campsite, nothing beats the simplicity and comfort of a hearty one-pot meal. Dutch ovens are perfect for big-batch cooking, letting you serve up delicious dinners with minimal mess and maximum flavor. From spicy jambalaya to rich beef stew, these recipes are designed to satisfy everyone around the fire.
Campfire Chili
This classic dish is a camping favorite for a reason. Its easy to make in large quantities, packed with protein, and tastes even better after simmering over the fire.
Ingredients:
- 2 lbs ground beef or turkey
- 1 large onion, chopped
- 3 cloves garlic, minced
- 2 cans diced tomatoes
- 2 cans kidney beans, drained
- 1 can black beans, drained
- 3 tbsp chili powder
- Salt and pepper to taste
Instructions:
- Brown the meat in your Dutch oven over medium heat.
- Add onions and garlic; cook until soft.
- Stir in tomatoes, beans, and chili powder.
- Simmer for at least 30 minutes, stirring occasionally.
Hearty Beef Stew
A warm bowl of beef stew hits the spot after a long day outdoors. This recipe feeds a crowd and only gets better as it cooks low and slow.
Ingredients:
- 3 lbs beef chuck, cubed
- 4 carrots, sliced
- 4 potatoes, cubed
- 1 onion, chopped
- 3 cups beef broth
- 2 tbsp tomato paste
- 2 tsp thyme
- Salt and pepper to taste
Instructions:
- Sear the beef cubes in batches until browned on all sides.
- Add vegetables, broth, tomato paste, and seasonings.
- Cover and let simmer for 1.5 to 2 hours until meat is tender.
Cajun-Style Jambalaya
This Louisiana-inspired dish brings bold flavors to your campsite. It’s colorful, filling, and comes together in one pot—perfect for sharing.
Ingredients:
- 1 lb smoked sausage, sliced
- 1 lb chicken breast or thighs, diced
- 1 bell pepper, chopped
- 1 onion, chopped
- 2 cups long-grain rice
- 4 cups chicken broth
- 1 can diced tomatoes (optional)
- Cajun seasoning to taste
Instructions:
- Sauté sausage and chicken until browned.
- Add veggies and cook until softened.
- Add rice, broth, tomatoes (if using), and seasoning.
- Bring to a boil, then reduce heat and cover. Cook about 25 minutes until rice is done.
Quick Comparison: Which Recipe Suits Your Trip?
| Dinner Option | Main Protein | Cook Time (Approx.) | Crowd Size Served* |
|---|---|---|---|
| Campfire Chili | Ground Beef/Turkey | 45 mins | 8-10 people |
| Beef Stew | Cubed Beef Chuck | 2 hours | 10-12 people |
| Cajun Jambalaya | Sausage & Chicken | 40 mins | 8-10 people |
*Serving sizes may vary based on portion size and appetite.
No matter which dish you choose, these Dutch oven dinners will keep your campers happy and full—with less cleanup so you can enjoy more time under the stars.
5. Tips, Tricks, and Cleanup Hacks
When youre cooking for a crowd at camp with a Dutch oven, the last thing you want is unnecessary stress. Here are some practical tips and clever hacks to make your big-batch cooking experience smoother—from prep to cleanup.
Handy Cooking Tricks
- Prep at Home: Chop veggies, marinate meats, and pre-mix spice blends before you hit the campsite. Store them in labeled zip-top bags or containers for easy access.
- Use Foil Liners: Lining your Dutch oven with heavy-duty foil can help reduce sticking and makes cleanup easier.
- Layer Ingredients: When making stews or casseroles, layer ingredients with longer cook times on the bottom so they get more heat.
Keeping Food Hot
No one wants cold chili after a long hike. Use these methods to keep your dishes warm until everyone’s ready to eat:
- Lid On, Coals Off: Once your meal is cooked, leave the lid on and move the pot away from direct coals to keep it warm without overcooking.
- Towel Wrap: Wrap the Dutch oven in a thick towel or blanket (away from open flames) to trap heat like a mini cooler in reverse.
- Thermal Bags: Insulated food carriers or thermal bags can keep side dishes like cornbread or baked beans warm for hours.
Working with Coals
The number of coals you use and where you place them can make or break your meal. Heres a quick guide for heat control:
| Dutch Oven Size | Total Coals | Top Coals | Bottom Coals |
|---|---|---|---|
| 10-inch | 21 | 14 | 7 |
| 12-inch | 27 | 18 | 9 |
| 14-inch | 35 | 23 | 12 |
*Tip: Use a chimney starter to light coals faster and more evenly—no lighter fluid needed!
Cleanup Made Easy
- No Soap Needed: For cast iron Dutch ovens, skip the soap. Just rinse with hot water and use a scraper or brush to remove food bits.
- Baking Soda Boost: Sprinkle baking soda on stubborn spots and scrub gently—it helps lift residue without damaging seasoning.
- Dry Thoroughly: After washing, dry your Dutch oven completely over low heat to prevent rusting.
- Oil It Up: Rub a thin coat of vegetable oil on the inside before storing it—this keeps your cast iron seasoned and ready for next time.
Campsite Trash Tips
- Ziploc It: Bring extra gallon-sized bags to store scraps and leftovers. They’re leak-proof and easy to pack out.
- Ditch Disposable Plates: Use reusable camping plates and utensils to cut down on waste—and cleanup is usually just a quick rinse away!
A little planning goes a long way when youre feeding a hungry group outdoors. With these simple strategies, youll spend less time stressing over logistics and more time enjoying good food under the stars.