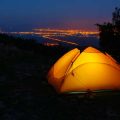
Choosing the Right Campsite
When it comes to building the perfect campfire for Dutch oven cooking, the first step is picking a safe and suitable campsite. Not every spot is ideal for an open fire, so it’s essential to consider a few critical factors before you strike a match. Below are some practical tips to help you select the best location while keeping safety and convenience in mind.
Key Factors to Consider
| Factor | Why It Matters | What To Look For |
|---|---|---|
| Local Regulations | Prevent fines and wildfires | Check with rangers or park offices; look for posted signs about fire bans or designated fire rings. |
| Wind Direction | Avoid spreading embers and smoke issues | Select a spot shielded from prevailing winds; set up downwind from tents and gear. |
| Proximity to Cooking Area | Ensures convenience and safety while cooking | Keep your campfire close enough for easy access, but far enough from tents and flammable materials (at least 15 feet). |
| Ground Surface | Reduces risk of fire spreading | Choose bare soil, gravel, or established fire pits—avoid grassy or brushy areas. |
| Clearance Overhead & Around | Keeps flames away from trees and brush | Pick a site with at least 10 feet of clearance above and around the fire area. |
Pro Tips for American Campgrounds
- Use Established Fire Rings: Most U.S. campgrounds provide designated fire rings or pits—always use these if available.
- No Trace Left Behind: If campfires are allowed but no pit exists, practice Leave No Trace principles by using a portable fire pan or mound fire method.
- Scout Your Surroundings: Make sure there are no low-hanging branches, dry leaves, or other natural debris nearby that could catch fire.
- Think Like a Local: In many national parks and forests, gathering firewood is prohibited. Bring your own seasoned wood or charcoal specifically for Dutch oven cooking.
Your First Step to Campfire Cooking Success
Selecting the right campsite sets the foundation for a safe and enjoyable Dutch oven cooking experience. By following these guidelines, you’ll be well on your way to creating memorable camp meals without risking your safety—or the great outdoors.
2. Gathering the Best Firewood and Materials
When it comes to Dutch oven cooking, your campfire’s quality depends heavily on the type of firewood, kindling, and tinder you use. Selecting the right materials ensures a long-lasting, steady heat that’s essential for even cooking. Here’s how you can source and prepare what you need for a perfect campfire:
Choosing the Right Firewood
The best firewood for Dutch oven cooking is dense hardwood because it burns hotter and longer, providing consistent coals ideal for slow-cooking or baking. In the U.S., common hardwoods include oak, hickory, maple, and ash. Softwoods like pine or spruce burn fast and hot but leave behind fewer usable coals and can produce resinous smoke that affects food flavor. For reference, see the comparison below:
| Wood Type | Burn Rate | Coal Production | Flavor Impact |
|---|---|---|---|
| Oak | Slow | Excellent | Mild/Neutral |
| Hickory | Slow | Excellent | Savory/Smoky |
| Pine (Softwood) | Fast | Poor | Resinous/Not Recommended |
| Ash | Moderate | Good | Mild/Neutral |
Sourcing Kindling and Tinder
Tinder is your first step: look for dry leaves, pine needles, small twigs, or even cotton balls soaked in petroleum jelly. These catch a spark easily and help ignite your kindling quickly. For kindling, gather pencil-thin sticks or split pieces of softwood—this layer bridges the gap between your tinder and larger firewood, creating a sustainable flame.
Where to Find Materials Locally?
If you’re camping in a state park or national forest, check local regulations before collecting wood—some areas require you to bring your own to prevent ecological impact. In most American campgrounds, pre-packaged bundles of seasoned hardwood are available at ranger stations or local stores. If allowed to gather on-site, stick to dead and downed wood rather than breaking branches off living trees.
Pro Tip: Prepare Ahead!
Ahead of your trip, consider bringing a mix of store-bought hardwood (for cooking) and locally sourced kindling and tinder (for ignition). This way, you’re ready for any weather conditions and can ensure your Dutch oven meals turn out perfectly every time.

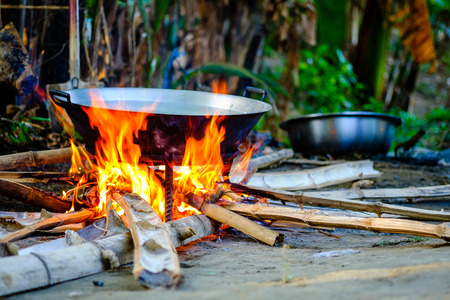
3. Constructing the Campfire for Dutch Oven Cooking
When it comes to Dutch oven cooking in the great outdoors, the type of campfire setup you use can make or break your meal. Let’s walk through step-by-step instructions for building two of the most popular and effective campfire setups—Log Cabin and Charcoal Bed—both tailored for Dutch oven use.
Step-by-Step: Log Cabin Campfire Setup
- Choose Your Location: Pick a flat, clear spot away from overhanging branches and dry grass. Always follow local fire regulations.
- Laying the Foundation: Place two parallel logs about 12-18 inches apart. Stack two more logs on top perpendicularly to form a square.
- Build the Cabin: Alternate stacking layers, leaving plenty of space in the center for airflow. Build up to 4–5 layers high for stability and heat distribution.
- Add Kindling and Tinder: Fill the center with tinder (dry leaves, small twigs) and kindling (slightly larger sticks).
- Light It Up: Ignite the tinder from the bottom. The structure will burn inward, creating a stable, even bed of coals perfect for setting your Dutch oven on top or nearby.
Step-by-Step: Charcoal Bed Campfire Setup
- Select a Safe Surface: Use an established fire ring or clear an area down to bare soil.
- Arrange Charcoal Briquettes: Place enough charcoal briquettes in a single layer roughly matching the diameter of your Dutch oven.
- Ignite Charcoal: Light the charcoal using a chimney starter or lighter cubes. Wait until they’re covered with white ash—this means theyre ready.
- Position Your Dutch Oven: Place the oven directly on top of some hot coals, then add additional briquettes on the lid for even baking or roasting.
Campsite Fire Setup Comparison Table
| Setup Type | Best For | Heat Control | Ease of Use |
|---|---|---|---|
| Log Cabin | Simmering stews, soups, slow cooking | Moderate – can add wood as needed | Intermediate |
| Charcoal Bed | Baking breads, roasting meats, desserts | High – precise number of briquettes controls temp | Easy |
Pro Tips:
- If baking, remember that placing more coals on top than underneath helps avoid burning the bottom of your dish.
- A shovel or tongs is handy for safely moving hot coals around your campfire setup.
The right campfire structure ensures even heat, minimizes flare-ups, and makes managing your Dutch oven easy—even if you’re new to outdoor cooking. Select your setup based on what’s on your menu and enjoy reliable results every time!
4. Lighting and Maintaining Your Fire
Getting your campfire started safely and keeping it burning at a steady temperature is crucial for successful Dutch oven cooking. First, make sure your fire ring or pit is clear of any flammable debris and positioned away from tents, trees, or overhanging branches. Use only designated fire pits in established campgrounds, as these are designed to contain heat and minimize wildfire risks.
How to Safely Ignite Your Campfire
To light your fire, start with tinder such as dry leaves, pine needles, or commercial fire starters. Arrange kindling in a teepee or log cabin style over the tinder, allowing plenty of airflow. Ignite the tinder with a match or lighter, shielding the flame from wind. Gradually add small sticks until the fire grows strong enough for larger logs. Never use gasoline or lighter fluid—they’re dangerous and can ruin the flavor of your food.
Maintaining Consistent Heat for Dutch Oven Cooking
Consistent heat is key for Dutch oven recipes. Once you have a good bed of hot coals, push some aside for direct heat under your oven and keep some ready for placement on the lid if needed. Monitor the color of the coals; glowing red is ideal for most cooking. You may need to add fresh wood periodically to maintain the temperature, but avoid large flames that can scorch food or damage your Dutch oven’s seasoning.
Quick Reference: Fire Temperature Control
| Fire Stage | Temperature Range (°F) | Best For |
|---|---|---|
| Glowing Red Coals | 450-600 | Baking/Browning |
| White Hot Coals | 600-700+ | Searing/Boiling |
| Low Orange Coals | 350-450 | Simmering/Slow Cooking |
Pro Tip: The Hand Test
If you don’t have a thermometer, try the classic “hand test” to estimate heat: Hold your palm about six inches above the coals and count how many seconds you can comfortably keep it there—2-3 seconds means high heat, 4-5 seconds medium, 6-8 seconds low.
By lighting your campfire properly and managing the coals carefully, you’ll be able to create consistent results with your Dutch oven recipes—whether you’re baking biscuits or slow-cooking chili under the stars.
5. Managing Heat and Cooking with a Dutch Oven
Mastering heat management is key to successful Dutch oven campfire cooking. Unlike your kitchen stove, a campfire’s heat isn’t consistent, so learning how to control it makes all the difference in your meals. Here’s what you need to know:
Techniques for Controlling Heat Levels
The most common way to regulate temperature with a Dutch oven is by adjusting the number and placement of hot coals or embers. Generally, more coals mean higher heat, but even distribution matters just as much as quantity. Use long-handled tongs or a shovel to move coals as needed.
| Desired Temperature (°F) | Total Coals | Lid (Top) Coals | Bottom Coals |
|---|---|---|---|
| 325 | 16 | 11 | 5 |
| 350 | 18 | 12 | 6 |
| 375 | 19 | 13 | 6 |
Placing and Arranging Coals for Even Cooking
For baking or roasting, place more coals on the lid than underneath—this mimics an oven’s top-down heat. For simmering or stewing, use more bottom heat. Rotate both the oven and lid a quarter turn every 15 minutes for even cooking and to avoid hot spots.
Handy Coal Placement Tips:
- If baking bread or cake, prioritize lid coals for browning.
- If making stew or chili, focus on steady bottom heat.
Classic Dutch Oven Recipes to Try Out
- Cowboy Stew: Layer beef, potatoes, carrots, and beans; cover with broth and let it simmer low and slow over steady coals.
- Cornbread: Prepare batter at home, pour into a greased Dutch oven, place extra coals on the lid, and bake until golden.
- S’mores Cake: Layer chocolate, graham cracker crumbs, and mini marshmallows; bake with balanced heat above and below for that gooey campfire treat.
The secret to perfect Dutch oven campfire meals is patience and practice—keep experimenting with coal numbers and recipes until you find what works best for your camping crew!
6. Clean-Up and Campfire Safety
Once you’ve enjoyed a delicious meal from your Dutch oven, it’s crucial to practice responsible campfire management and cleanup. Properly extinguishing your fire, cleaning your equipment, and leaving no trace are essential steps to ensure the great outdoors remain beautiful for everyone.
Extinguishing Your Campfire Safely
Never leave a campfire unattended or assume it will burn out on its own. Here’s a step-by-step guide to putting out your campfire safely:
| Step | Description |
|---|---|
| Drown | Slowly pour water on the fire, including all embers—not just the red ones. Listen for hissing sounds. |
| Stir | Use a shovel or stick to stir the ashes and embers while adding more water. This ensures everything is wet and cool. |
| Feel | Cautiously hover the back of your hand over the ashes to check for heat. If it’s too hot to touch, add more water and stir again. |
| Repeat | Continue until everything is cold to the touch. Only then is it safe to leave your campsite. |
Cleaning Your Dutch Oven the Right Way
A clean Dutch oven will last for generations. After cooking:
- Let it cool: Wait until the oven is safe to handle.
- Scoop out food residue: Use a plastic scraper or wooden spatula—never metal, which can damage seasoning.
- Add warm water: Avoid soap if your oven is cast iron; gently scrub with a brush or sponge.
- Dry thoroughly: Wipe dry and set over low heat to evaporate any remaining moisture.
- Oil lightly: Rub a thin layer of cooking oil inside before storing to prevent rust.
Leave No Trace Principles
The best campers are those who leave their sites better than they found them. Follow these tips:
- Packing Out Trash: Bring a trash bag and take all waste—including food scraps—home with you.
- Ash Disposal: Scatter cooled ashes over a wide area away from the campsite or pack them out if regulations require.
- No Fire Scars: Use established fire rings when available, and disguise any signs of your campfire if you had to build one from scratch.
Quick Reference: Leave No Trace Checklist
| Task | Status (✓/✗) |
|---|---|
| All trash packed out | |
| Ashes dispersed or packed out | |
| No fire scars left behind | |
| Dutch oven cleaned & oiled | |
| Campsite checked for belongings |
By following these essential steps, you’ll ensure your campfire cooking adventures are safe, sustainable, and enjoyable for everyone who follows in your footsteps.