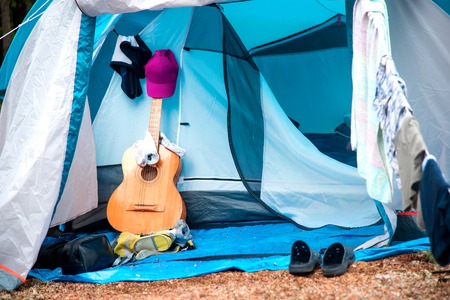
Understanding Camping Trip Clothing Essentials
Before you start cramming your entire closet into your backpack, it’s crucial to get real about what clothing you actually need for a camping trip. The key is to pack smarter, not heavier. First off, consider the climate—are you heading into the humid forests of the Pacific Northwest, the dry heat of a desert in Utah, or the unpredictable weather of the Appalachian Mountains? Each environment demands its own essentials. For warm climates, moisture-wicking shirts, lightweight hiking pants or shorts, and a breathable sun hat are must-haves. Cold weather? Think thermal base layers, an insulated jacket, wool socks, and a beanie. No matter where you’re headed, always include a rain shell or poncho; Mother Nature loves surprises. Now factor in your camping style: car campers can afford a few extra comforts like camp shoes or lounge wear, but if you’re backpacking every ounce counts—stick to versatile items that can be layered and worn multiple times. Bottom line: break it down by activity and weather forecast so you only bring what’s mission-critical. This approach keeps your load light and leaves more room for other outdoor essentials.
Choosing the Right Fabric and Layering
If you want to pack smart for a camping trip in the U.S., choosing the right clothing materials is just as crucial as saving space in your backpack. American campers know that weather can shift from sunny to stormy within hours—especially in places like the Rockies or Pacific Northwest. That’s why picking versatile fabrics and mastering the art of layering will keep you comfortable, dry, and ready for anything.
Fabric Options: Merino Wool vs. Synthetics
| Fabric | Pros | Cons |
|---|---|---|
| Merino Wool | Excellent insulation, stays warm when wet, naturally odor-resistant, soft on skin | Can be pricier, dries slower than synthetics |
| Synthetics (Polyester/Polypropylene) | Lightweight, quick-drying, budget-friendly, durable | Can retain odors, less warmth if wet compared to wool |
The American Approach: Versatile Layering System
Experienced American campers use a three-layer system—base, mid, and outer—to handle unpredictable conditions without overpacking:
- Base Layer: Wicks sweat away from your skin; go for merino wool or synthetic tees and long underwear.
- Mid Layer: Adds insulation; think fleece pullovers or lightweight down jackets. These trap heat but aren’t bulky.
- Outer Layer: Shields against wind and rain; a waterproof shell or rain jacket does the trick.
Packing Tip: Mix and Match for Space Savings
Pick pieces that work together in different combinations. Americans often choose neutral colors like black, gray, or olive so every layer pairs up well—meaning fewer clothes to pack overall.
Pro Move for U.S. Campers
Toss in one multi-use item like a buff or neck gaiter—it can serve as a hat, face cover, or even an emergency potholder. Smart fabric choices and strategic layering are the backbone of packing light while staying ready for anything Mother Nature throws at you.
3. Rolling vs Folding: Maximizing Space in Your Pack
Rolling, Folding, and Bundling: The Showdown
When you’re gearing up for a camping trip, every inch of pack space counts. Let’s break down the three most common clothing packing methods—rolling, folding, and bundling—to see which one works best for outdoor adventures in the U.S.
Rolling Clothes
Pros:
- Saves a ton of space—perfect for smaller backpacks
- Keeps clothes wrinkle-resistant and easy to grab
- Makes it simple to organize by item type or outfit
Cons:
- Not ideal for bulky items like thick hoodies or jeans
- Can be tricky with dress shirts (if you want to look sharp at camp!)
How-to:
- Lay your clothing item flat.
- Fold sleeves or sides inward (for shirts or pants).
- Tightly roll from one end to the other, smoothing as you go.
- Secure with a rubber band if needed for ultra-compressed packing.
Folding Clothes
Pros:
- Easiest and quickest method—great if you’re packing last-minute
- Keeps structured items looking crisp (think button-downs)
- Simplifies stacking inside your duffel or tote bag
Cons:
- Takes up more space than rolling, especially for soft fabrics
- Can lead to creases if packed too tightly
How-to:
- Lay clothing flat and smooth out wrinkles.
- Bend sleeves inward (for shirts) or fold legs (for pants).
- Fold in half, then again into thirds if needed to fit your pack.
Bundling Clothes
Pros:
- Minimizes wrinkles—ideal for campers who want to look fresh on arrival
- Packs multiple items together in a single bundle for easy grab-and-go organization
Cons:
- A bit of a learning curve—takes practice to master the technique
- Difficult to access individual items without unwrapping the whole bundle
How-to:
- Lay out your largest item (like a jacket) flat.
- Add layers of smaller items (shirts, tees, underwear) on top, alternating directions.
- Place socks or undies in the center as a “core.”
- Wrap each layer around the core until you have a tight bundle.
The bottom line: Rolling is king for most U.S. campers who value space and organization, but don’t be afraid to mix methods based on your needs and gear. Try them all before your next adventure—you’ll find your perfect fit!
4. Using Compression Bags, Stuff Sacks, and Cubes
When it comes to maximizing space in your camping pack, nothing beats smart use of compression bags, stuff sacks, and packing cubes. These are tried-and-true tools among American campers who want to keep their gear organized and their packs streamlined for the trail. Here’s a breakdown of these essentials and how they can level up your packing game:
Compression Bags & Sacks
Compression bags—sometimes called compression sacks—are a staple for U.S. backpackers and car campers alike. Made from durable, lightweight materials, these bags use straps or valves to squeeze extra air out of your clothing bundle, reducing volume significantly. They’re especially handy for bulkier items like jackets or sleeping clothes.
Benefits of Compression Sacks:
- Save significant space by removing air
- Protect clothing from moisture
- Keep dirty and clean clothes separate
Packing Cubes
Packing cubes are another favorite among American outdoor enthusiasts. These zippered fabric containers come in various sizes and are perfect for keeping outfits or types of clothing together. Not only do they make it easy to find what you need without dumping your entire pack, but they also help maintain order when you’re living out of a backpack or duffel bag at camp.
Packing Cube Advantages:
- Organize by type (shirts, socks, underwear)
- Quick access to any item without hassle
- Easy to transfer between camp and car or tent
Choosing the Right Gear: A Quick Guide
| Gear Type | Best For | Main Advantage |
|---|---|---|
| Compression Bag/Sack | Bulky items (jackets, pants) | Maximizes space by compressing contents |
| Packing Cube | Smaller clothing items (t-shirts, socks) | Keeps gear organized and easily accessible |
Pro Tip:
If you’re heading to unpredictable weather zones, look for waterproof or water-resistant versions of these storage solutions—they’ll protect your spare layers from rain or river spray.
The bottom line? Whether you’re hiking deep into the backcountry or setting up basecamp with friends, using compression sacks and packing cubes helps you pack smarter—not harder—so you’ll have more time enjoying nature and less time digging through your gear.
5. Smart Packing: Prioritizing Accessibility and Order
When youre out in the wild, fumbling through your pack for a fresh pair of socks or your rain jacket can be more than just annoying—it can cost you precious time or even comfort. Smart packing is about keeping your most-used clothing items easy to grab, no matter what Mother Nature throws at you. Here’s how seasoned campers keep their gear organized and accessible, field-tested by real outdoor enthusiasts across the U.S.
Keep Essentials on Top
Start by identifying which clothes you’ll reach for the most—think base layers, extra socks, and that all-important hoodie or rain shell. Pack these items right at the top of your duffel or backpack. For example, if you’re camping in Colorado where weather shifts fast, having your rain jacket just under the lid of your pack means you’re ready when those clouds roll in.
Use Stuff Sacks and Packing Cubes
Invest in a few lightweight stuff sacks or packing cubes. Assign each cube a category—underwear and socks in one, shirts in another, pants and shorts in a third. Mark them with different colors or labels for quick identification. This system isn’t just about saving space; it’s about knowing exactly where everything is when the sun’s going down and you need to change fast.
Real-World Scenario: The Early Morning Layer Shuffle
Picture this: You’re in Yosemite, temps dropped overnight, and you’re crawling out of your tent before sunrise to catch a view of Half Dome. With smart packing, your warm fleece is sitting right on top, not buried beneath days’ worth of dirty clothes. Within seconds, you’re bundled up and ready to hit the trail instead of digging around while shivering in the dark.
Pro Tip: Dirty Clothes Bag
Bring a dedicated bag for dirty laundry—preferably one that’s water-resistant and packs down small. As you swap out used clothing, stash it here to keep clean gear separate and make repacking a breeze on the last day.
In-the-Field Adjustment
If you notice after day one that you’re reaching for certain items more than expected (maybe it’s hotter than forecasted), don’t hesitate to reshuffle your system at camp each night. Adaptability is key to staying organized outdoors.
By prioritizing accessibility and order when packing your clothes, you’ll spend less time rummaging and more time enjoying the adventure—no matter where your campsite is pitched.
6. Keeping Clothes Dry and Odor-Free
If you’ve ever woken up to soggy jeans or a shirt that smells like last night’s bonfire, you know keeping your clothes dry and fresh is key when camping in the wild. Out in the American backcountry, unpredictable weather and smokey campfires are facts of life. Here’s how to outsmart Mother Nature and keep your clothing game strong.
Shielding from Rain and Dew
Trash Bags: Old-school but effective, heavy-duty trash bags are a budget-friendly way to protect your clothes from rainstorms and morning dew. Line your backpack with one before packing, or use individual bags for each outfit—just squeeze out the air before sealing to save space.
Dry Sacks: If you’re serious about outdoor gear, invest in waterproof dry sacks. These lightweight, roll-top bags keep moisture out even if your pack takes a spill in a creek. Pro tip: Use different colors or sizes to organize by day or activity, making quick outfit changes easy at camp.
Beating Campfire Smells
Charcoal Packs: Campfire stories are great, but nobody wants their clothes smelling like smoke for days. Slip a small charcoal deodorizer pouch (the kind used for shoes or closets) into your clothing bag. The activated charcoal absorbs funky odors without adding any weird scents of its own.
Extra Tips for Tough Conditions
If the forecast looks rough, double-bag your most important layers—like base layers and socks—in both a trash bag and a dry sack. Pack a mini clothesline and some clothespins so you can air out damp items away from smoky fire pits or wet ground.
Stay Ready for Anything
In the end, keeping your clothes dry and odor-free is all about smart layering and using simple tools that don’t weigh you down. With these tricks, you’ll stay comfortable no matter what the American wilderness throws at you—and maybe even smell fresh enough to share a tent with.
7. Pro Tips for Fast Campsite Repacking
Packing up at the end of a camping trip can be just as important as your initial prep—especially when you’re tired and ready to hit the road. Here are some tried-and-true, practical habits from seasoned American campers to help you repack your clothing efficiently and leave no trace behind.
Sort Before You Start
Before you even unzip your tent, take a few minutes to separate dirty clothes from clean ones. Use designated stuff sacks or plastic bags for laundry. This keeps your pack organized and prevents unwanted smells from spreading to your fresh gear.
Roll, Don’t Fold
Rolling clothes isn’t just for packing before the trip—it works wonders when repacking, too. Rolled clothes fit into odd spaces in your bag and keep things tight, so you won’t have to wrestle with a bulging backpack on the way home.
Embrace the “Last In, First Out” Method
Think ahead: items you’ll need immediately upon getting home (like your car keys, wallet, or phone charger) should be packed last so they’re easy to grab first.
Shake Off Dirt and Debris
A quick shake or brush-down of your clothing before packing up prevents you from bringing half the campsite back with you. This also helps reduce cleanup time once you get home.
Use Compression Sacks for Bulky Items
If you brought along heavy jackets or extra layers, compression sacks can shrink these items down fast, maximizing space in your pack for the hike out or drive back.
Check for Forgotten Clothing
Do a final sweep of your campsite—look under sleeping pads, inside tents, and around the fire pit. US campsites often have lots of nooks where socks or hats can disappear!
Keep Wet Clothes Separate
If any clothing is damp, stash it in a separate waterproof bag. This keeps everything else dry and makes laundry easier once you’re home.
Create a “Grab-and-Go” Outfit
Pack one clean set of comfortable clothes on top of your bag. After a long drive or hike back from the campground, youll appreciate not having to dig through everything just to find something fresh to wear.
By adopting these habits, youll make breaking camp smoother and ensure your gear—and memories—stay organized for next time out in the wild.