1. Why Make-Ahead Meals Work for Campfire Cooking
When youre out in the great outdoors, nothing beats the smell of a hot meal cooking over a campfire. But lets be honest—after setting up your tent, gathering firewood, and managing the kids or gear, the last thing you want is a complicated dinner prep. That’s where make-ahead Dutch oven meals come in to save your camping trip.
Prepping meals before you hit the campsite can turn a potentially stressful evening into an easygoing one. Whether youre camping in a national park or at a rustic backwoods site, having your food ready to go means less hassle and more time enjoying nature.
Benefits of Make-Ahead Dutch Oven Meals
Here’s why prepping meals ahead of time is a game-changer for campfire cooking:
| Benefit | Why It Matters |
|---|---|
| Time-Saving | No chopping, slicing, or measuring at camp—just heat and eat. |
| Less Mess | Fewer dishes and no raw ingredients mean easier cleanup with limited water. |
| Stress-Free Cooking | You can relax around the fire instead of rushing to get dinner done. |
| Consistent Results | Cooking at home gives you better control over seasoning and doneness. |
| Better Food Storage | Pre-cooked meals are easier to store safely in coolers or camp fridges. |
The Dutch Oven Advantage
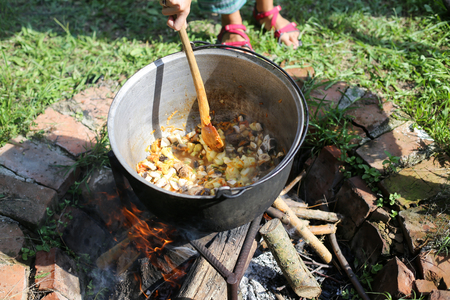
The Dutch oven is the MVP of rustic campfire cooking. Its heavy-duty build holds heat like a champ, making it perfect for reheating stews, baking casseroles, or slow-cooking meats. When you pair it with make-ahead recipes, you unlock the easiest path to gourmet-level meals in the wild.
Examples of Great Make-Ahead Dutch Oven Dishes:
- Hearty beef stew prepped at home and simmered over hot coals
- Cornbread casserole baked halfway at home and finished on-site
- Pulled pork that just needs reheating while you toast buns over the fire
Pro Tip:
Store each meal in labeled zip-top bags or reusable containers with reheating instructions so anyone in your group can help with mealtime—even if theyre not expert cooks!
With make-ahead Dutch oven recipes, youll spend less time prepping and more time soaking up everything camping has to offer—from stargazing to s’mores-making.
2. Dutch Oven Essentials for Outdoor Cooking
When it comes to rustic campfire cooking, a Dutch oven is your best friend. Whether youre simmering stews or baking biscuits, this heavy-duty pot can do it all—right over the fire. But before you start tossing ingredients into the pot, it’s important to understand the tools, gear, and techniques that make Dutch oven cooking successful in the great outdoors.
Must-Have Tools & Gear
A successful Dutch oven setup doesnt require a ton of fancy equipment, but having the right tools makes things easier and safer.
| Gear | Purpose |
|---|---|
| Dutch Oven with Legs & Lid | The legs elevate the pot above hot coals; the flanged lid holds coals on top for even heat. |
| Lid Lifter | Keeps your hands safe when lifting a hot lid full of coals. |
| Long-Handled Tongs | Helps you safely move and adjust hot coals. |
| Heat-Resistant Gloves | Essential for handling hot cast iron and avoiding burns. |
| Charcoal Chimney Starter | Makes lighting charcoal quick and even without lighter fluid. |
| Dutch Oven Table (Optional) | A raised surface specifically designed for Dutch oven cooking, keeping everything off the ground. |
Seasoning Your Dutch Oven
If your Dutch oven is made from raw cast iron (not enameled), seasoning it is essential. Seasoning forms a natural non-stick coating and prevents rust. Heres a simple way to do it:
- Wash with warm water and mild soap (only for the first use).
- Dry completely with a towel or by heating over low flame.
- Rub a thin layer of vegetable oil or shortening all over the inside and outside.
- Bake upside down in an oven at 375°F for about an hour. Let cool inside the oven.
Managing Heat with Coals
The key to mastering Dutch oven cooking is learning how to control temperature using charcoal briquettes. A general rule of thumb: each briquette adds about 10–15°F of heat. Heres a basic guide:
| Dutch Oven Size | Total Briquettes | Lid/Top | Bottom |
|---|---|---|---|
| 10-inch | 21 | 14 on top | 7 underneath |
| 12-inch | 25 | 17 on top | 8 underneath |
| 14-inch | 33 | 22 on top | 11 underneath |
Campsite Tip:
If youre cooking over a campfire instead of charcoal, wait until you have a good bed of glowing embers. Avoid open flames—they’re too unpredictable for steady cooking.
Caring for Your Cast Iron in the Wild
- Avoid using soap after seasoning—hot water and a stiff brush will do the trick.
- Dried food stuck? Boil water in the pot to loosen it up, then scrape gently.
- Never leave it wet—dry thoroughly and apply a light coat of oil before storing.
- If rust shows up, scrub with steel wool, rinse, dry, re-season, and its good as new!
Your Dutch Oven Adventure Starts Here!
A well-prepared Dutch oven setup makes your make-ahead camping meals taste just like home—if not better! With these essentials in place, youre ready to tackle any recipe under open skies. Just remember: keep it simple, stay safe around fire, and have fun experimenting with flavors while soaking up that fresh outdoor air.
3. Prep-at-Home Recipes for Easy Campfire Meals
One of the best ways to enjoy your time around the campfire is to do most of the cooking prep at home. With a Dutch oven and a little planning, you can create hearty, rustic meals that just need to be heated or finished over the fire. These make-ahead recipes are perfect for feeding a hungry camping crew without spending hours chopping and stirring at your campsite.
Chili: A Classic That Gets Better with Time
Chili is one of those dishes that actually tastes better after sitting for a day or two, making it an ideal make-ahead meal. Cook up a big batch at home using ground beef, beans, tomatoes, and your favorite spices. Let it cool, then store it in a sealed container or freezer bag. At the campsite, simply reheat it in your Dutch oven over the fire until bubbling hot.
Pro Tip:
Add toppings like shredded cheese, chopped onions, or crushed tortilla chips once its heated up for extra flavor and texture.
Hearty Stews: Comfort Food Around the Fire
Stews are another great option that can be prepped entirely at home. Use chunks of beef or chicken with root vegetables like carrots and potatoes. Add broth and seasonings, then simmer until everything is tender. Let it cool completely before packing it for your trip. On-site, rewarm it slowly over low heat in your Dutch oven.
| Ingredient | Prep at Home | Finish at Camp |
|---|---|---|
| Beef Stew Meat | Sear and simmer with broth and veggies | Reheat until hot |
| Carrots & Potatoes | Peel and chop; cook in stew | No further prep needed |
| Seasonings | Add during home prep | Taste and adjust if needed |
Layered Casseroles: Just Heat and Eat
Casseroles are easy to assemble at home and transport in foil trays or Dutch oven liners. Think baked ziti, enchilada bakes, or even layered breakfast casseroles with eggs, sausage, and hash browns. Prepare them fully at home, let them cool, then refrigerate or freeze until youre ready to head out. At camp, place the casserole in your Dutch oven and heat it slowly over coals until warmed through.
Easy Campfire Casserole Ideas:
- Baked Ziti: Pasta, marinara sauce, ricotta, mozzarella—fully assembled at home.
- Breakfast Bake: Eggs, cheese, sausage, hash browns—perfect for morning energy.
- Taco Layer Bake: Ground beef, tortillas, beans, cheese—top with salsa after heating.
The beauty of these make-ahead Dutch oven meals is that they give you more time to relax and enjoy the outdoors while still serving up delicious food thatll impress your fellow campers.
4. Storage and Transport Tips for Prepped Ingredients
Prepping your Dutch oven meals ahead of time is a smart move, but keeping those ingredients fresh until you’re ready to cook over the campfire is just as important. Whether you’re heading to the mountains or a lakeside campground, proper storage and transport can make all the difference in taste and safety. Here’s how to do it like a seasoned camper.
Choose the Right Containers
Use containers that are airtight, leak-proof, and stackable. Mason jars work great for sauces and marinades, while reusable silicone bags are perfect for chopped veggies or pre-measured spices. Make sure all containers are labeled with the contents and date packed.
Recommended Container Types
| Ingredient Type | Best Container | Why It Works |
|---|---|---|
| Sauces & Marinades | Mason Jars | Airtight seal keeps liquids secure and fresh |
| Chopped Vegetables | Silicone Bags or BPA-Free Plastic Containers | Flexible, space-saving, and easy to clean |
| Dry Spices & Herbs | Small Spice Jars or Pill Organizers | Keeps portions organized and prevents spills |
| Meats (pre-marinated) | Zippered Freezer Bags or Vacuum-Sealed Bags | Reduces air exposure and prevents leaks in your cooler |
Cooler Hacks to Keep Food Fresh
A good cooler setup is key when transporting perishable items. Always chill your cooler overnight before packing, and use block ice instead of cubes—it melts slower. Pack raw meat at the bottom, then layer other items by cooking order so youre not digging around each time you need something.
Smart Cooler Packing Tips:
- Use two coolers: One for food, one for drinks to reduce how often you open the food cooler.
- Add frozen water bottles: They keep things cold and double as drinking water later.
- Separate raw meats: Prevent cross-contamination by storing them in separate bags or containers.
- Keep a thermometer inside: Ensure the internal temp stays below 40°F (4°C).
Transporting Tips for Long Drives
If you have a long trip to your campsite, consider using insulated grocery bags or soft-sided coolers to transfer prepped ingredients from your fridge to your main cooler. These help maintain temperature during loading and travel time. Avoid opening the cooler during transit—plan ahead so everything is easily accessible once you arrive at camp.
Quick Checklist Before You Hit the Road:
- [ ] All containers sealed tight and labeled
- [ ] Cooler packed with ice packs or frozen bottles
- [ ] Meats stored at the bottom of cooler
- [ ] Dry goods stored separately in a weather-proof bin
- [ ] Thermometer checked inside cooler before leaving home
- [ ] Essential items placed on top for quick access at camp
With these tips, your make-ahead Dutch oven ingredients will stay fresh and organized—so when it’s time to cook, you can focus on enjoying rustic campfire meals without stress.
5. Campfire Cooking Techniques with a Dutch Oven
When it comes to rustic campfire cooking, mastering a few key Dutch oven techniques can make all the difference—especially when youre working with make-ahead meals. These skills ensure your food cooks evenly and tastes just as delicious as if it were made fresh on-site.
Stacking Coals for Precise Heat
Unlike cooking in your home kitchen, campfire heat isn’t controlled by turning a knob. Instead, you’ll use charcoal briquettes or wood embers to create consistent temperatures. One of the most effective methods is stacking coals both under and on top of your Dutch oven to surround it with heat.
Coal Placement Guide
| Desired Temperature (°F) | Total Briquettes | Top Lid | Bottom Base |
|---|---|---|---|
| 325°F | 16 | 11 | 5 |
| 350°F | 18 | 12 | 6 |
| 375°F | 20 | 13 | 7 |
Temperature Control Tips
If youre using charcoal, let the briquettes ash over before placing them around your Dutch oven. This gives off more even heat. For wood fires, wait until you have steady glowing embers before positioning your oven. Keep extra coals nearby so you can replace them every 30–45 minutes for long cook times.
The Art of Rotating Your Dutch Oven
A classic trick for even cooking is rotating both the lid and the base of your Dutch oven during the process. Every 15 minutes or so, rotate the pot a quarter turn clockwise and the lid a quarter turn counterclockwise. This helps eliminate hot spots and ensures your make-ahead meals—like stews, cobblers, or baked pasta—are cooked evenly throughout.
Keep a Lid Lifter Handy
Lid lifters aren’t just for safety—they’re essential for checking your food without disturbing the coal arrangement too much. Use one to lift the lid carefully, avoiding ash from falling into your food. Quick peeks help you monitor progress while keeping things clean and controlled.
Practice Makes Perfect
Your first few times cooking with a Dutch oven over a fire might take some trial and error—but that’s part of the fun. With some practice using these techniques, you’ll be able to serve up hearty, flavorful make-ahead dishes that taste like they were made right in your backyard kitchen—even if you’re deep in the woods.
6. Cleanup Tricks to Keep Your Campsite Eco-Friendly
After a hearty meal cooked in your Dutch oven, its important to clean up efficiently while respecting the environment. Keeping your campsite clean and following Leave No Trace principles not only protects nature but also ensures future campers can enjoy the same beautiful spots.
Quick Dutch Oven Cleaning Tips
A well-maintained Dutch oven lasts for years and delivers consistently great meals. Here’s how to clean it up without a hassle:
| Step | What to Do |
|---|---|
| 1. Cool Down | Let your Dutch oven cool slightly, but not completely cold—lukewarm is ideal for easier cleaning. |
| 2. Wipe First | Use a paper towel or cloth to wipe out excess food and grease before washing. |
| 3. Use Hot Water Only | Avoid soap; just use hot water and a non-metal brush or scraper to remove food bits. |
| 4. Dry Completely | Set over low heat or dry with a towel to prevent rusting. |
| 5. Re-Season (If Needed) | If your Dutch oven looks dull or dry, apply a thin layer of cooking oil and heat gently. |
Eco-Friendly Waste Disposal
Disposing of waste properly is key to keeping campsites pristine:
- Food Scraps: Pack them out or dispose of them in designated trash bins if available.
- Dirty Water: Strain food particles out and scatter at least 200 feet away from water sources, trails, and campsites.
- No Soap in Streams: Even biodegradable soap can harm aquatic life—use a wash basin instead.
Packing Out Trash Like a Pro
Always bring enough trash bags and sealable containers so you can pack out all waste. A good rule: leave the site cleaner than you found it.
Trash Essentials Checklist
| Item | Purpose |
|---|---|
| Heavy-duty trash bags | For packing out all waste securely |
| Ziploc bags or containers | To store leftovers or greasy scraps safely |
| Small shovel/trowel | If you need to bury greywater (check local regulations) |
| Paper towels/cloths | For wiping cookware before washing to reduce residue |
Respecting Leave No Trace Principles
Caring for the outdoors means following these simple habits:
- Plan ahead so you have everything needed for cleanup.
- Avoid leaving food behind that could attract wildlife.
- Tidy up your cooking area before heading out or going to bed.
- If fires are allowed, burn small food scraps completely or pack them out.
By wrapping up your Dutch oven meals with these easy cleaning methods, youll be doing your part to preserve nature while making campfire cooking even more enjoyable for everyone.