1. Campfire Cooking Essentials
If youre ready to take your outdoor meals to the next level, mastering campfire cooking starts with having the right essentials. Whether youre deep in the backcountry or chilling at a family-friendly campsite, these are the tools and techniques that’ll turn your fire into a full-blown outdoor kitchen.
Must-Have Campfire Cooking Tools
Before you even strike a match, make sure you’re equipped with these go-to items:
| Item | Purpose | Why It’s Essential |
|---|---|---|
| Cast Iron Skillet | Cooking over open flame | Durable, retains heat well, perfect for searing or frying |
| Dutch Oven | Baking, stews, slow-cooking | Versatile and ideal for one-pot meals |
| Grill Grate | Grilling meats and veggies | Makes direct flame cooking easier and more consistent |
| Long-Handled Tongs & Spatula | Handling hot food safely | Keeps hands safe from flames while flipping or stirring |
| Heat-Resistant Gloves | Fire safety and cookware handling | Essential when moving hot pots or adjusting coals |
Fire-Starting Techniques That Actually Work
You can’t cook without fire — so let’s talk about how to build one that lasts. Here are three popular methods used by seasoned campers across the U.S.:
Teepee Fire Layout
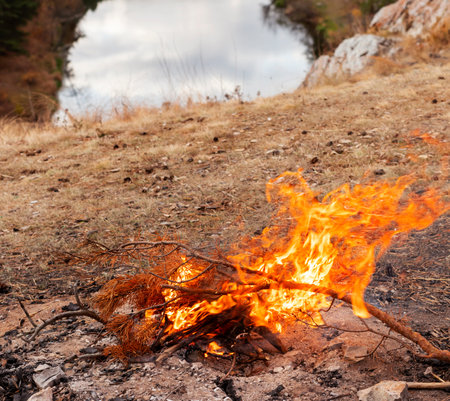
This is one of the easiest and most effective ways to start a fire. Stack kindling in a cone shape with tinder in the center. Light the tinder, and as it burns, it will ignite the kindling and larger logs around it.
Log Cabin Fire Layout
Create a square stack of wood like Lincoln Logs with tinder and kindling in the middle. This structure allows air to flow through easily and gives you a steady, long-lasting flame—great for Dutch oven meals.
Pyramid Fire Layout (Upside-Down Fire)
This method involves stacking large logs on the bottom, medium logs above them, then kindling and tinder on top. As the fire burns downward, it feeds itself and requires minimal maintenance—perfect for early morning breakfasts.
Setting Up Your Outdoor Kitchen Space
An organized cooking area makes all the difference when youre working with open flames. Heres what you need:
- Flat ground: Look for a stable surface away from dry brush or overhanging branches.
- Fire ring or pit: Use established fire pits when available; if not, build one using rocks to contain flames.
- Prep table or surface: A foldable camping table works great for prepping ingredients.
- Cooler: Keeps perishables fresh—use ice packs or frozen water bottles to reduce mess.
- Campsite trash bag: Keep your area clean and wildlife-free by disposing of food waste properly.
Pro Tip:
A headlamp is your best friend when cooking after dark—hands-free lighting makes chopping onions way safer!
With these campfire cooking essentials dialed in, you’re all set to build a reliable outdoor kitchen that’s ready for anything nature throws your way.
2. Building the Perfect Campfire
Before you can start whipping up delicious meals in the wild, you need to master one essential skill: building the right kind of campfire. The type of fire you build can make or break your outdoor cooking experience. Whether youre grilling burgers or slow-cooking a stew, understanding how to safely build, maintain, and control your fire based on your meal plan and campsite environment is key.
Types of Campfires for Cooking
Different meals require different heat sources. Heres a quick guide to help you choose the best campfire setup:
| Fire Type | Best For | Description |
|---|---|---|
| Teepee Fire | Quick boiling, roasting marshmallows | Easy to start and burns hot and fast—great for short-term cooking. |
| Log Cabin Fire | Grilling, consistent heat | Offers a stable structure with a longer burn time and even heat distribution. |
| Pit Fire | Slow-cooking, Dutch oven recipes | Dug into the ground to trap heat—perfect for low-and-slow meals. |
| Star Fire | Fuel efficiency, simmering over time | Adds logs inward as needed, conserving wood while keeping steady heat. |
Step-by-Step: How to Build a Safe Cooking Fire
Step 1: Choose Your Spot Wisely
Select a flat, open area at least 15 feet away from tents, trees, and gear. Use an existing fire ring if available to minimize environmental impact.
Step 2: Gather Your Materials
- Tinder: Dry leaves, small twigs, newspaper.
- Kindling: Sticks about the thickness of your finger.
- Fuel Wood: Logs that will keep the fire going.
- Firestarter: Matches or a lighter (waterproof is best).
Step 3: Build Your Fire Structure
Create your chosen fire type (teepee, log cabin, etc.) using tinder in the center, then kindling around it, followed by fuel wood as needed.
Step 4: Light and Monitor Your Fire
Light the tinder and gradually feed more wood as it catches. Keep an eye on flame size and adjust for cooking needs. For example, let flames die down to glowing coals for even grilling or pan cooking.
Campfire Safety Tips
- Never leave your fire unattended.
- Keep water or sand nearby in case of emergencies.
- Avoid building fires in windy conditions.
- Fully extinguish your fire before leaving or going to sleep.
- Use long-handled tools when cooking to avoid burns.
Campsite Regulations Matter
Always check local rules about campfires—some areas may have restrictions due to dry weather or wildlife concerns. In those cases, consider using a portable camping stove instead of an open flame.
A well-built campfire is more than just warmth—it’s your outdoor kitchen foundation. With a little planning and care, youll be ready to cook up anything from sizzling steaks to gooey smores like a pro.

3. Classic Campfire Recipes
When it comes to campfire cooking, there are a few timeless dishes that never fail to satisfy. Whether youre out with friends or enjoying some solo time in nature, these go-to favorites are simple, delicious, and perfect for beginners. Lets dive into how to master foil packet meals, hot dogs, and smores—the holy trinity of campfire cuisine.
Foil Packet Meals: Easy & Flavorful
Foil packet meals (also called “hobo packets”) are a campers best friend. They’re easy to prep, require minimal cleanup, and cook beautifully over an open flame. Heres a basic method:
Classic Foil Packet Recipe: Chicken & Veggies
| Ingredients | Quantity |
|---|---|
| Boneless chicken breast | 1 per person |
| Sliced potatoes | 1 medium per person |
| Carrot slices | ½ cup per person |
| Onion slices | ¼ cup per person |
| Olive oil | 1 tbsp per packet |
| Salt & pepper | To taste |
Instructions:
- Tear off a large piece of heavy-duty aluminum foil for each serving.
- Add chicken, veggies, olive oil, and seasonings to the center of the foil.
- Fold the foil over the ingredients and seal all edges tightly to form a packet.
- Place packets on hot coals or a grill grate over the fire for about 25–30 minutes, flipping halfway through.
- Check for doneness before serving (chicken should be fully cooked).
The All-American Hot Dog
No campfire experience is complete without roasting hot dogs over an open flame. Its easy, fun, and always hits the spot.
Steps:
- Skewer your hot dog with a roasting stick or long skewer.
- Hold it over the fire, rotating slowly for even cooking.
- Cook until evenly browned and heated through (about 5–7 minutes).
- Serve on a bun with your favorite toppings—ketchup, mustard, relish, or even chili!
Smores: The Sweet Finale
This classic campfire dessert brings people together like no other. Gooey marshmallows, melted chocolate, and crunchy graham crackers—what’s not to love?
S’mores Ingredients Per Serving:
| Item | Quantity |
|---|---|
| Graham crackers (halved) | 2 pieces |
| Marshmallows (large) | 1–2 pieces |
| Chocolate squares (milk or dark) | 1–2 pieces |
How to Make It:
- Roast marshmallow over the fire until golden brown or crispy—your choice!
- Place chocolate on one graham cracker half.
- Add the roasted marshmallow on top of the chocolate.
- Top with the second graham cracker half and gently press together.
- Let sit for a few seconds so the chocolate begins to melt. Enjoy!
No matter your experience level around the campfire, these classic recipes will have you cooking up crowd-pleasing meals in no time. Theyre tasty, versatile, and guaranteed to bring smiles all around the fire pit.
4. Cooking Techniques in the Wild
When youre out in the wild, cooking over a campfire isnt just about heating up food—its about enjoying the process and creating tasty meals with simple tools. Whether youre a beginner or a seasoned camper, knowing different cooking techniques can take your outdoor meals to the next level. Here are some tried-and-true methods you can use during your next camping adventure.
Grilling Over an Open Flame
Grilling is one of the most popular and straightforward ways to cook over a campfire. All you need is a grill grate placed over hot coals or flames. You can grill everything from burgers and steaks to vegetables and even fruit. Just make sure your fire has burned down enough to create steady heat, and keep an eye on flare-ups from dripping fats.
Pro Tip:
Bring along a cast iron grill grate—it holds heat well and adds great flavor to your food.
Using a Dutch Oven
A Dutch oven is a camper’s best friend. This heavy-duty pot can be used to bake, stew, roast, and fry right over the fire or nestled into hot coals. It’s perfect for making hearty meals like chili, cobblers, or even fresh bread while youre off-grid.
How to Use It:
- Place hot coals under the Dutch oven for bottom heat.
- Add more coals on top of the lid for even baking or roasting.
- Rotate the pot and lid occasionally to avoid hot spots.
Roasting on a Stick
This classic method is fun for all ages and works great for foods that don’t need much prep—think hot dogs, sausages, marshmallows, or even skewered veggies. Find a sturdy stick (or bring metal skewers), sharpen one end, and roast directly over the flames or glowing coals.
Best Foods to Roast:
| Food Item | Roasting Time | Tips |
|---|---|---|
| Hot Dogs | 5–7 minutes | Rotate evenly for crispy skin |
| Marshmallows | 1–2 minutes | Hold above glowing coals for golden brown results |
| Veggie Skewers | 8–10 minutes | Brush with oil to prevent sticking |
Cooking Directly on Coals
If youre feeling adventurous (and hungry), try cooking directly on hot embers. This technique gives food an incredible smoky flavor and works well for foil packet meals, baked potatoes, or even flatbreads. Just wrap your ingredients tightly in aluminum foil and place them right on top of the coals.
Quick Ideas for Coal Cooking:
- Baked Potatoes: Wrap in foil and cook for 30–45 minutes.
- Foil Pack Meals: Combine meat, veggies, seasoning; seal well; cook for 20–30 minutes.
- Bannock Bread: Flatten dough into discs; place on hot stones near coals until golden.
Safety Note:
Always use long-handled tools or gloves when handling food near the fire to prevent burns. And be sure your fire is fully extinguished before leaving your campsite.
No matter which method you choose, campfire cooking is all about creativity, patience, and enjoying good food under open skies. Try mixing up techniques based on what youre cooking and how much time you have—there’s no wrong way to do it as long as you’re safe and having fun!
5. Tips for Planning and Packing Ingredients
When it comes to campfire cooking, a little planning goes a long way. Whether youre heading out for a weekend getaway or an extended backcountry adventure, smart ingredient prep and packing can make your meals tastier, easier, and less wasteful.
Choose the Right Ingredients
Pick ingredients that are versatile, durable, and easy to cook over an open flame. Avoid items that spoil quickly unless you have a reliable cooler. Heres a quick breakdown of good options:
| Category | Camp-Friendly Options | Why They Work |
|---|---|---|
| Proteins | Canned tuna, pre-cooked sausage, vacuum-sealed chicken | Long shelf life and easy to heat up |
| Veggies | Bell peppers, onions, potatoes, corn | Hold up well without refrigeration and cook great over fire |
| Carbs | Rice, pasta, tortillas, instant mashed potatoes | Lightweight and filling options that cook quickly |
| Spices & Condiments | Salt, pepper, garlic powder, hot sauce packets | Add flavor without taking up space |
Prepping Before You Go
Doing some food prep at home can make campfire cooking much smoother. Chop veggies, marinate meats (then freeze them), and pre-measure spices into small containers or resealable bags. Label everything so you know what’s what.
Pro Tip:
Use mason jars or reusable silicone bags for wet ingredients like sauces or marinades. Theyre leak-proof and eco-friendly.
Packing Smart to Minimize Waste
Avoid overpacking by planning each meal in advance. Stick to simple recipes with overlapping ingredients to cut down on bulk. Pack perishables at the bottom of your cooler with ice packs on top for better temperature control.
Efficient Packing Checklist:
- Meal Plan: List out each meal youll make per day.
- Labeled Containers: Use clear containers with labels for easy access.
- Dry vs Wet Separation: Keep dry goods separate from perishables.
- Trash Bags: Bring extra for food waste and wrappers.
- Reusable Utensils: Cut down on single-use plastics.
A little time spent prepping and organizing before your trip means more time enjoying the campfire—and the delicious meals you’ll make over it!


